


Dashing Diva Glaze Starter Nail Art Gummy Bear + Magic Pick Nail Art 32ct

Dashing Diva Glaze Starter Nail Art Gummy Bear + Magic Pick Nail Art 32ct - New
WE SHIP WORLDWIDE
Não foi possível carregar a disponibilidade de recolha
Buy any 2 items | Get 10% off |
Buy any 3 items | Get 15% off |
Buy 4 or more items | Get 20% Off |
Free shipping on all orders over $30
Free shipping on all orders over $30
Get free shipping on all orders over $30. Consider adding more to your basket to take advantage of this offer.
Authenticity and quality guaranteed
Authenticity and quality guaranteed
We only partner with trusted retailers and brands with full traceability back to the manufacturing source. All of our products have their authenticity guaranteed and are put through our rigorous 6-point quality control process.
Shop sustainably with This is Beauty
Shop sustainably with This is Beauty
Every product you purchase from This is Beauty helps reduce the environmental impact of the beauty industry. Just because there is an imperfection doesn’t mean the product should end up in landfill. What's inside is perfect!
Semi-cured clear gel nail strips featuring iridescent confetti glitter with mega volume and maximum shine. A complete starter kit to achieve the pro-finish and sculpted effect of a salon gel manicure at home with ease. GLAZE innovation is a semi-cured gel strip delivering salon results: molded shape, mega volume, and mirror shine that's gel strong for up to 14 days.
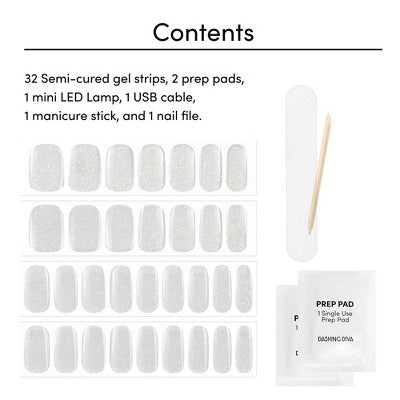
INCLUDES: 32 semi-cured gel nail strips (in 12 sizes), 2 prep pads, 1 LED Mini Lamp, 1 nail file, 1 manicure stick.
STEP 1: PREP
Wash hands with soap and water.
Shape nails and push back cuticles.
Use the enclosed Prep Pad to ensure your nails are clear from oils and residue.
Make sure your nails are completely dry before application.
PRO TIP: Because GLAZE is an all-in-one product, no additional base coat, topcoat, or nail strengthener is needed.
STEP 2: SELECT SIZE
Hold the sheet over each nail to find your size. If you are in between sizes, always size down.
STEP 3: REMOVE FILM
Remove the protective film.
STEP 4: APPLY
Gently lift the strip from the sheet starting from the edge.
Place the strip over the center of your nail, starting at your cuticle line and pressing outward. For optimal adhesion, the strip should be placed above the cuticle line, avoiding skin or cuticles.
STEP 5: PRESS
Press down firmly from the center and side to side.
STEP 6: TRIM
Trim the strip flush to your nails using nail scissors or nail clippers.
STEP 7: CURE
Cure under LED light for 45 seconds.
STEP 8: FILE
Position the nail file horizontally along the contour of your nail. With one sweeping motion, file firmly across your free edge. Make sure GLAZE does not exceed beyond your nail length. Any overhang will cause chipping or cracking.
PRO TIP: Using the wooden manicure stick, gently press down on the GLAZE strip to thoroughly seal the edges before curing. This will prevent hair and debris from catching onto the nail strip perimeter.
PRO TIP: For optimal adhesion, avoid exposing nails to lotions, oils, or water for at least one hour after application.
HOW TO REMOVE
STEP 1: APPLY
Apply Dashing Diva Magic Off or cuticle oil on your nail bed.
STEP 2: LIFT
Use the included manicure stick to gently and slowly lift the nail strip from the corner of the cuticle area.
Gradually push the strip off your nail.
CAUTION: Do not peel off with force or in one quick motion.
Magic Pick
Premium nail art stickers featuring presents, snowflakes, ornaments, and so many metallic holiday accents! Dashing Diva's MAGIC PICK 3D Nail Art stickers make customizing your mani easy! These high-impact, 3-dimensional nail art stickers can be worn with GLOSS, MAGIC PRESS, GLAZE, or on natural nails.
INCLUDES: 50+ nail art stickers, 2 precision placement tools
HOW TO USE:
Make sure nails are clean, dry, and free from oils or lotions before application.
STEP 1: Using the clear area of the Precision Placement Tool select design by pressing down firmly to lift sticker off clear backing paper.
Pro Tip: For larger stickers, the pink tool is best; for smaller stickers, use the peach tool.
STEP 2: Position placement tool over nail and press down to ensure adhesion. Slowly peel back the tool from the sticker to release.
STEP 3: Smooth sticker edges to ensure adhesion.
PRO TIP: For optimal staying power, apply one coat of clear topcoat when finished. Repeat process to create your custom manicure!
HOW TO REMOVE:
To remove, simply wipe away the sticker using nail polish remover.
HELPFUL HINTS:
• Be sure to clean the precision tool(s) between uses to maintain the adhesion. Gently cleanse the adhesive surface with an alcohol pad. Ensure tool is completely dry before choosing design.
• If applying nail art hours after manicure, wash hands with soap and water thoroughly for clean nail surface.
• Store and save nail art in a cool, dry place for your next manicure!


-
ACCESSIBILITY
Shop NowYour favorite brands and products at accessible prices, with quirks and imperfections and their own story to tell.
-
SUSTAINABILITY
About UsCombating unnecessary waste in the beauty industry by purchasing perfectly good products to keep them in circulation for longer.
-
COMMUNITY
TIB BlogWe’re a movement. A community. A conversation. We’re working with you to have hard conversations and change from the inside out.